Copying Octopus Deploy Variables Between Projects Using PowerShell and the REST API
Published January 18, 2024
Heidi Housten
After our introductory blog on updating Octopus Deploy variables via the rest API, it is time to dig a little deeper into the possibilities.
Octopus Deploy is a great tool for automating and managing deployments and it has a solid REST API. You can browse the API via Swagger using this example site (https://demo.octopus.app/swaggerui/index.html) or adding the Swagger path to your own instance URL if you want to be able to send some queries against real data. Let's look at a use case for the REST API.
Related projects often share common variables, and occasionally, you might wish to copy variables from one project to another. If you are as OCD (or lazy 😉) as we are, you groan inwardly at the thought of manually going back and forth to copy a bunch of variable names and values. I initially used the swagger interface for copying variables but wanted something a little simpler that wouldn't scare less technical colleagues.
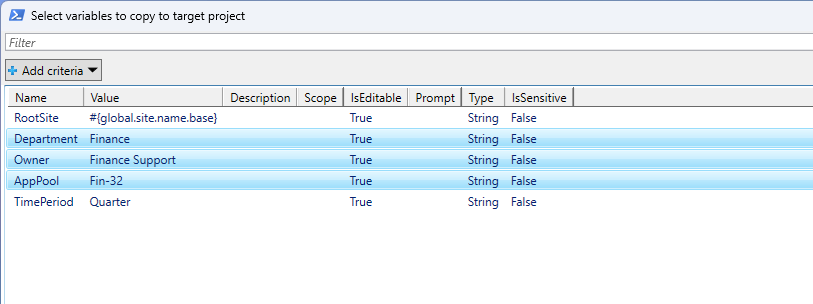
I will take you through the resulting PowerShell script that allows you to select variables from one Octopus Deploy project, as in the picture below, and import them into another, saving time and reducing the risk of human error.
Of course, global or team values should be kept in Library Sets, but some teams use project variables even to hold global values to make it clear exactly which variables are used in that specific project, whether they are local or global.
Prerequisites
Before diving into the script, you'll need a few prerequisites:
- API Key: You need an Octopus Deploy API key with appropriate permissions.
- Octopus Deploy URL: Replace
"https://yourInstance.octopus.app"with the URL of your Octopus Deploy instance. - Source and Target Project Names: Set the
$sourceProjectNameand$targetProjectNamevariables to the names of your source and target Octopus Deploy projects, respectively.
Understanding the PowerShell Script
Now, let's break down the PowerShell script step by step:
- Authentication: The script starts by prompting for the API key, defining the Octopus Deploy URL, and creating the Octopus api key header.
- API Requests: Two helper functions,
putDataandgetData, are defined to simplify making PUT and GET requests to Octopus Deploy's REST API and to keep the main code a little cleaner. - Main Logic:
- The script begins by fetching the source project information.
- The source project's variables are retrieved using the link from the project information.
- A graphical grid view is displayed, as shown above, allowing the user to select the variables to import from the source project to the target project.
- The target project information and variables are retrieved.
- The selected variables are added to the target project's variables.
- Finally, the updated target project variables are sent back to Octopus Deploy to be saved.
- Error Handling: The script includes simple error handling to capture and display any exceptions that may occur during execution.
The Script
$sourceProjectName="Demo.WebA"
$targetProjectName="Demo.WebB"

$ODAPIKey = Read-Host -Prompt "Enter your Octopus Deploy API Key"
$ODUrl = "https://yourInstance.octopus.app"

# re-useable for each project
$projectLink = "/api/projects?name={0}"

$headers = @{
 "X-Octopus-ApiKey"="$ODAPIKey"
 "accept"="application/json"
}

function putData ($link, $body)
{
    $QueryString = "{0}{1}" -f $ODUrl, $link
    $body_utf8 = ([System.Text.Encoding]::UTF8.GetBytes($($body | ConvertTo-Json -Depth 15)))
    $requestResponse = Invoke-WebRequest -uri $QueryString -Method Put -Body $body_utf8 -ContentType "application/json" -Headers $headers
    Write-Host "Update Status: $($requestResponse.StatusCode) $($requestResponse.StatusDescription)"
}

function getData ($link)
{
    # Create querystring from partial link
    $QueryString = "{0}{1}" -f $ODUrl, $link
    Invoke-RestMethod -uri $QueryString -Method Get -Headers $headers
}
#                  -----------   Main code   --------------
try {

    # Get Source Project
    $sourceProject = (getData $($projectLink -f $sourceProjectName)).Items

    # Get Source Variables
    $sourceVars = getData $sourceProject.Links.Variables

    #Allow user to select variables to import using gridview
    $importVars = $sourceVars.Variables | Select-Object -Property * -ExcludeProperty Id | Out-GridView -PassThru -Title "Select variables to copy to target project"

    # Get Target Project
    $targetProject = (getData $($projectLink -f $targetProjectName)).Items

    # get target variables
    $targetVariables = getData $targetProject.Links.Variables

    Write-Host "Target variable version pre-update: $($targetVariables.Version)"

    $targetVariables.Variables += $importVars
    putData $targetProject.Links.Variables $targetVariables

}
catch
{
    Write-Host $_.Exception.Message
    Write-Host $_.Exception.Response.StatusDescription
    Write-Host $_.ErrorDetails
}
How to Use the Script
- Replace the placeholder values in the script with your actual Octopus Deploy URL and project names.
- Open PowerShell terminal and run the script.
- The script will prompt you for your Octopus Deploy API key. Enter the key and press Enter.
- The script will prompt you to select the variables you want to import from the source project, as shown in the screen shot in the introduction.
- After the variables are imported, you'll see the status of the update.
Notes
This script is a starting point for copying variables between Octopus Deploy projects. There are a few things to keep in mind:
- The script doesn't look for pre-existing variables with the same name in the target project. If there is a variable with the same name, it will get an additional value, with the scope of the source project's variable.
- The script doesn't account for different spaces or tenants.
- The script doesn't add corresponding variable sets to the target project, if the source project variable values come from a variable set.
- The Powershell gridview allows filtering the variables by name using the search box and you can select multiple variables by holding down the ctrl key while clicking.
- The gridview doesn't have sizing parameters so it can look a little funky if you don't have many variables.
- Sometimes the Powershell gridview window will be hidden behind other windows, so if you don't see it a few seconds after entering your api key, check your taskbar powershell icons.
Conclusion
I implemented only what I needed for a one off use in the script. You can further customize it to meet your specific needs with improvements like turning it into a commandline tool with parameters for the projects or allowing/disallowing updating of existing variables, or allowing different spaces and then your brain power can be used for something less mind-numbing than manual copying!